終於搞定了,來聊聊這次備份主機所遇到的問題吧
我用VMWare安裝mint來架設一個Linux Server
參考網站:the best way to install LAMP server in GNU/Linux
1. 輸入下列command安裝LAMP Server
sudo apt-get install lamp-server^
這指令連php、phpmyadmin、apache 與 MySQL 都幫你裝好了
路徑在/etc底下,裝完就會有/var/www這資料夾了。
2. 測試網頁是否可以正確開啟
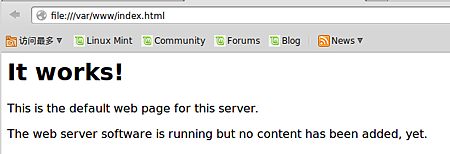
/var/www/index.html 雙擊這個檔案會直接連到firefox開啟網頁,如下圖
另外在firebox網址上輸入ip也會連到這個網頁,代表成功了。

3. 修改Apache2的啟動使用者
安裝完LAMP Server 系統會自行建立一個使用者來啟動Apache2,即「www-data」
輸入下列command 將www-data改成自己的使用者名稱
sudo kate /etc/apache2/envvars
將apache_run_user 、 apache_run_group 改為使用者名稱
趕完之後,輸入下列command 重新啟動 Apache2
sudo /etc/init.d/apache2 restart
4. 更改www權限
這樣要上傳檔案比較方便,輸入下列command
cd /var
sudo chown -R user:user www
command裡面的user為使用者名稱
改完可以看一下是否成功更改權限
ls -al www
5.上傳wordpress 的public_html 與 sql
使用WinSCP上傳檔案,但在連線時發生網路錯誤,拒絕連線
結果是Mint忘記安裝Open SSH Server
參考資料:How to Install SSH Server
輸入下列command安裝ssh
sudo apt-get install openssh-server
安裝完即可用WinSCP傳檔案到Mint裡來了
我將public_html 放在 /var/www裡面
6. 登入phpmyadmin
帳號用root,密碼則是剛剛在安裝LAMP Server時設定的密碼
一開始進入phpmyadmin有兩個錯誤

我是覺得都沒差,不過資料庫一直匯入錯誤,讓我覺得該不會是這邊的問題吧
後來發現根本完全沒關係,最後還是留個黃色驚嘆號~
CentOS 6.4 (64位元) 安裝 phpMyAdmin
老實說用安裝LAMP Server的phpmyadmin 東西少太多了
跟從網路上下載來的phpmyadmin,曾經一度想要替換掉
而且版本也不一樣,我開啟網頁phpmyadmin 版本是 3.5.8.1deb1;網路上的是 4.0.5
不過太多檔案都指向 /etc/phpmyadmin 了
不過下command
sudo apt-get install phpmyadmin 竟然是最新版本耶
我不經想你到底指向哪一個phpmyadmin了
不過我下載的那個phpmyadmin應該是從頭到尾系統都沒在鳥他吧
不過裡頭的 config.inc.php 與 /examples/create_tables.sql 倒是幫了大忙
 根據參考資料,我要去掉第一個錯誤「短語密碼」,是因為config.in.php 的設定問題
在更改之前作了被份
cp /etc/phpmyadmin/config.in.php /etc/phpmyadmin/config_backup.in.php
接著修改config.in.php,在裡面加了這句
$cfg['blowfish_secret'] = 'a8b7c6d';
我將原本的comment掉了
/*if (check_file_access('/var/lib/phpmyadmin/blowfish_secret.inc.php')) {
require('/var/lib/phpmyadmin/blowfish_secret.inc.php');
}*/
解決!
 另外下列也改一改,auth_type 改不改都沒差,認證方式不同罷了
$cfg['Servers'][$i]['auth_type'] = 'http';
| config | 帳號跟密碼直接寫在 config.inc.php 裡,是最基本的認證方式,安全性也最低。只建議在本機測試環境,或者確認伺服器是在防火牆之後,或者使用之前提過的 .htaccess 網頁認證模式 |
| cookies | 有比 config 模式更高的安全性,透過 MySQL 做認證,不需要儲存帳號密碼在設定檔中,是相當常使用的一種認證方式。在64位元的環境下,若有安裝 php-mcrypt 模組可加快存取的速度 |
| http | 擁有最高的安全性,除了使用 MySQL 認帳外,還提供基本的 HTTP 認證模式 |
 connect_type本來沒這個參數的,害我auth_type改成http就變成無法登入
參考資料:關於 phpMyAdmin 必須啟用Cookies 才能登錄的解決辦法
$cfg['Servers'][$i]['connect_type'] = 'socket';
$cfg['Servers'][$i]['extension'] = 'mysqli';
$cfg['Servers'][$i]['controlhost'] = '';
$cfg['Servers'][$i]['controluser'] = 'pma';
$cfg['Servers'][$i]['controlpass'] = 'pmapass';
/* Storage database and tables */
$cfg['Servers'][$i]['pmadb'] = 'phpmyadmin';
$cfg['Servers'][$i]['bookmarktable'] = 'pma_bookmark';
$cfg['Servers'][$i]['relation'] = 'pma_relation';
$cfg['Servers'][$i]['table_info'] = 'pma_table_info';
$cfg['Servers'][$i]['table_coords'] = 'pma_table_coords';
$cfg['Servers'][$i]['pdf_pages'] = 'pma_pdf_pages';
$cfg['Servers'][$i]['column_info'] = 'pma_column_info';
$cfg['Servers'][$i]['history'] = 'pma_history';
$cfg['Servers'][$i]['table_uiprefs'] = 'pma_table_uiprefs';
$cfg['Servers'][$i]['designer_coords'] = 'pma_designer_coords';
$cfg['Servers'][$i]['tracking'] = 'pma_tracking';
$cfg['Servers'][$i]['userconfig'] = 'pma_userconfig';
$cfg['Servers'][$i]['recent'] = 'pma_recent';
$cfg['Servers'][$i]['auth_swekey_config'] = '/etc/swekey-pma.conf';
改完後phpmyadmin 資料庫就會有很多pma開頭的資料表了
 phpMyAdmin 高級功能啟用的部分,至始至終我都沒解決過還不是活得好好的(阿喂
這部分參考上面連結吧,反正不管我怎麼改怎麼弄就是一直出現,反正我能正常使用了(YA
有幾個問題可以分享一下,不過這邊是MySQL的問題了
7. MySQL
有一個困擾我很久的問題就是我沒辦法匯入sql資料庫阿阿阿阿

奇怪的是這跟上傳大小也沒什麼關係阿,明明就比限制的小很多
但我還是乖乖去調參數了...
參考資料:phpmyadmin_FAQ_1.16
Starting with version phpMyAdmin 2.7.0,
the import engine has been re–written and these problems should occur much less than before.
If possible, upgrade yourphpMyAdmin to the latest version to take advantage of the new import features.
官方這一段讓我猶豫要不要更新phpmyadmin,但後來要裝時發現已是最新版本,樂跳這段
check the values of file_uploads, upload_max_filesize, memory_limit, upload_tmp_dir, max_input_time and post_max_size in the php.ini configuration file. All of these three settings limit the maximum size of data that can be submitted and handled by PHP. One user also said that post_max_size and memory_limit need to be larger than upload_max_filesize (don't forget to restart your webserver after changes)
這邊的重點就是
upload_max_filesize、memory_limit、post_max_size 要調大一點,然後後兩者要大於upload_max_filesize 這樣
之後想說要用command匯入,因此接下來都會用command
途中有遇上幾個問題
ERROR 1045(28000): Access denied for user ''@'localhost'
ERROR 1044 (42000): Access denied for user ”@’localhost’
ERROR 1044 (42000): Access denied for user ”@’localhost
這個應該教如何重設密碼吧,我就很莫名其妙的把密碼重設了
參考資料:Linux 中的 mysql数据库,命令被拒绝的问题(ERROR 1044: Access denied for user ''@'localhost')
樓上這位的問題我想是因為沒有root登入mysql吧
用root登入什麼databases都看得見了,太強大了
mysql -u root -p
接著輸入密碼,以root登入就可以了。
由於一直無法使用網頁板phpmyadmin匯入資料表
於是我決定用command匯入
參考資料:利用MySQL指令將資料匯出及匯入
mysql -u root -p "database" < "xxx.sql"
就這樣我把 phpmyadmin/examples/create_tables.sql 成功匯入了
mysql -u root -p mysql < /"phpmyadmin資料夾位置"/phpmyadmin/examples/create_tables.sql
順便也把wordpress的資料表全數匯入我的資料庫裡去。
另外提一點
Linux 中的 mysql数据库,命令被拒绝的问题(ERROR 1044: Access denied for user ''@'localhost')
原PO在18樓友分享解決心得,恩我在這邊出錯了
這邊分享主要是重置密碼,天殺我根本不需要重置什麼鬼密碼
/etc/init.d/mysql stop (service mysqld stop )
/usr/bin/mysqld_safe --skip-grant-tables
這兩行指令把我的mysqld.sock給弄不見了...
一般來說在 /var/run/mysqld 會有mysqld.pid、mysqld.sock
但在執行/usr/bin/mysqld_safe --skip-grant-tables時,好像出了一個錯,說是無法刪除mysqld.pid
請我手動刪掉它,然後就出問題了,在也登不進入mysql了
出了這個錯誤 ERROR 2002 (HY000): Can't connect to local MySQL server through socket '/var/run/mysqld/mysqld.sock' (2)
參考資料:error: 'Can't connect to local MySQL server through socket '/var/run/mysqld/mysqld.sock' (2)'
之後是輸入下列command 才又產生這兩個檔案的
pkill -9 mysqld
途中曾經幾次無法正確停止mysql
sudo /etc/init.d/mysql stop
Rather than invoking init scripts through /etc/init.d, use the service(8)
utility, e.g. service mysql stop
但是輸入 service mysql stop 又不理我
參考資料:Can't stop mysql on Ubuntu
其實只要多stop幾次就行了
在我的環境底下重啟apache2 與停止mysql等指令如下才能正確執行
重啟apache2:sudo /etc/init.d/apache2 restart
停止mysql:sudo /etc/init.d/mysql stop
8. 網頁
讓wordpress 指向備份主機
也就是在Linux系統底下,打開網頁瀏覽器輸入本機ip可以直接進入wordpress首頁
sudo kate /etc/hosts
新增幾個 127.0.0.1 "wordpress網址" 存檔然後試試在網頁瀏覽器上打上ip是否可以連到自己的wordpress
埃其實這邊還有幾個東西要設定
一是網頁目錄與首頁預設位置
二是資料庫
首先先解決一的問題
參考資料:Apache虛擬目錄和默認首頁的設置
Cannot find httpd.conf in Ubuntu
不改掉預設目錄及首頁會一直出現"It's work"的網頁永遠只不到你所要到的地方喔
根據第一個參考資料預設目錄設定放在 conf/httpd.conf
<Directory "希望網頁指向的資料夾">
Options Indexes MultiViews
AllowOverride None
Order allow,deny
Allow from all
DirectoryIndex default.php
</Directory>
一般這邊會預設 /var/www
不過我一直找不到httpd.conf,因此我找了弟二個資料
httpd.conf 會在 /etc/httpd/conf/httpd.conf 一樣找不到
之後找一個討論在Ubuntu底下,apache網頁預設目錄被放在
/etc/apache2/sites-available/default
將下列作修改即可,因為我把public_html放在www裡面
於是就讓預設目錄設定在這。
DocumentRoot /var/www/public_html
<Directory />
Options FollowSymLinks
AllowOverride None
</Directory>
<Directory /var/www/public_html>
Options Indexes FollowSymLinks MultiViews
AllowOverride None
Order allow,deny
allow from all
</Directory>
再來第二個問題
參考資料:如何解決WordPress "Error establishing a database connection(建立資料庫連線時發生錯誤)"
主要是資料庫設定錯誤
更換資料庫時要修改wp-config.php
// ** MySQL 設定 - 您可以從主機服務提供商獲取相關資訊。 ** //
/** WordPress 的資料庫名稱,請更改 "database_name_here" */
define('DB_NAME', ' 資料庫名稱');
/** MySQL 資料庫使用者名稱,請更改 "username_here" */
define('DB_USER', 'root');
/** MySQL 資料庫密碼,請更改 "password_here" */
define('DB_PASSWORD', '資料庫密碼');
/** MySQL 主機位址 */
define('DB_HOST', 'localhost');
/** 建立資料表時預設的文字編碼 */
define('DB_CHARSET', 'utf8');
/** 資料庫對照型態。如果不確定請勿更改。 */
define('DB_COLLATE', 'utf8_unicode_ci');
因為我是作備份主機,因此使用者直接root,因為用root登入我才能看到wordpress的資料庫
也懶得改權限~
主機位置本來是免費空間的網址,不過這裡要指向自己設定得那個,所以改成localhost
測試成功,結果!


 留言列表
留言列表


